Why use Polymer Clay for making molds?
Polymer clay is one of my favourite clays to use. You can use it to make dolls, home accessories, jewellery, cosplay accessories, sculptures and so much more. In this case we are going to go over how to make an object out of Polymer Clay that can be used to make a mold on the Mayku Formbox.
So what is polymer clay and why is it so good? Well it’s not technically a clay at all. It’s very durable because when cured the polymers inside fuse together making a kind of plastic. You can bake it in a home oven unlike most traditional clays.
You can make molds from it in all kinds of materials (including silicone) without using a mould release. You can sand it, drill it, paint it or mix it together to get a lot of different shades and effects. The possibilities are endless with the hundreds of varieties on the market.
Which Polymer Clay?
Not all polymer clays are created equal but they do all have their own uses. The main contenders and most widely available are Sculpey, Fimo and CosClay.
Sculpey
One of my all time favourites is Super sculpey in beige, It also comes in grey. The beige has a really nice translucent skin like texture once baked. It’s strong but not completely indestructible. It’s easy to condition the clay and get it soft and ready to work with. It’s a good all rounder for sculpts where a skin texture is important or you are planning to paint it.
Fimo
If you want to make something translucent or a specific colour you might be better off choosing one of the many Fimo clays. These are only sold in smaller amounts and work out more expensive than Sculpey but you can save time and money on painting the sculpture. It’s perfect for smaller decorative items like jewellery or for doing cane work. Not really the best choice for making a mold.
CosClay
The third option is the newest one. I got to be a beta tester for CosClay last year and I have to say it’s impressive stuff. It has the texture, colour range and translucency of super sculpey but with a special bonus… it’s flexible when baked. This not only makes the final sculpt pretty indestructible but it is really good for sculpting something you want to make a mould of. You can pull it out without fear of it being destroyed. For this project I will be using CosClay for it’s flexibility. The vacuum formed plastic mold will be rigid so being able to pull a sculpt out is ideal. You can use the other types but be sure to follow my top tips on suitable shapes for the best chance of making a reusable mold.
How to use Polymer Clay to Design a Mold
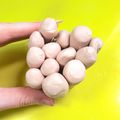
Conditioning the Polymer Clay
It’s really really really important to condition the clay. Basically this just means rolling and softening the clay to make sure it doesn’t have any cracks or air pockets stuck inside the block and makes it easier to sculpt with.
You can do this by hand or with a pasta machine. My favourite technique is to break off small pieces and squish them with my fingers before rolling long sausage shapes. Then I twist the sausages together, squish those and roll again. Finally I roll a few of these into a ball or thick sausage shapes ready to be used. Polymer clay can dry out with age. If your polymer clay is really hard and crumbly you can soften it using clay softener. An alternative is to use a tiny amount of baby oil. One drop goes a long way. If you add too much oil you can offset this by adding more dried out clay.
Tools
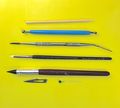
There are a huge variety of tools on the market for clay and I have bought most of them…. but at the end of the day I always come back to the same simple tools. My hands, a tooth pick or BBQ skewer, a pin, a rubber tip painters tool and a metal dental tool. (as seen below). Isopropyl alcohol is also useful in very small amounts when used with a paintbrush to smooth fingerprints from the clay.
Things to consider for your mold design….
For this type of mold using the FormBox you have to consider a few things. As we are forming a sheet of plastic over the shape it won’t pick up small details in the same way silicone would. There are however huge advantages over silicone. Besides silicone being messy and temperamental it’s also very expensive and time consuming. By using the Mayku sheets you can create a reusable mold for very little money in 5 mins. Not only that but you can create multiple molds very quickly which is vital if you want to start a craft business. Not only does it mean you only have to mix one batch of casting material and do one pour to get multiple items at once but you can also demold them all at the same time. Working in batches saves so much on time it means you can make significantly more profit without compromising on quality.
These are some things you should think about when designing your polymer clay mold master…
It needs to be simple, the less details and the more exaggerated they are the better.
No undercuts. This is the most important thing to consider. You need to be able to get the shapes out of the mould. Think of a pyramid. This is the perfect shape, as is a dome. The widest part is at the base and there are no parts sticking out that will trap the shape inside the mold.
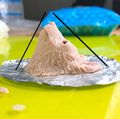
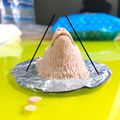
No big dips/ concave pieces. You could add air holes but it’s better to avoid them if possible for this project.
Adding air holes to your master object in critical areas will also improve the quality of the form when you get to the FormBox stage.
Think about what material you want to cast from the mould you make. Resin, concrete, plaster, jesso, chocolate? All are possible, think about how thick the materials will be in certain places. You don't want to make something that would be too fragile when cast with thin parts or areas where a UV resin would be too thick to cure.
Almost clay time…
Preparing a Polymer Clay Work Area - Dust be gone.
So now you need to prepare an area to work, you can use a tray on your lap, table etc but you will need a very clean dust free surface. I sometimes will use a sheet of a4 paper or piece of foil but a glass tile is ideal. I bought a couple of very cheap glass chopping boards that are light, tough and easy to clean down.
The ENEMY of clay is dust although if you are only making a blank to make a mold from it’s not the end of the world. I recommend this method -wash your hands thoroughly, air dry if you can or use kitchen towel. Now use a baby wipe for one last wipe over, don’t forget under your nails and then use it to clean down your work surface.
How to Create a Armature for Polymer Clay Sculpting
Depending on the size and shape of the sculpt a good way to save on clay and make the sculpt more durable is an armature. I use wire if I need to build a skeleton and then use aluminium baking foil to flesh the shape out. This is a good surface for the clay to stick to, it allows the clay to contract as it bakes meaning you are unlikely to get the cracks that can appear in a solid clay piece.
…… Clay time!
Polymer Clay Sculpts for Mold Making by Adele Morse
So I decided to do two small sculpts to try out some ideal shapes and textures on a smaller scale. One uses a foil base under the clay and one is solid clay. I used CosClay in medium beige using the tools I mentioned earlier.
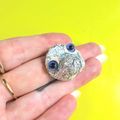
First I decided to sculpt a Dog head that I want to make into a brooch using clear UV resin. I rolled a small ball of aluminium foil to make the basic shape and used some small glass eyes off eBay. You can use glass beads or eyes but make sure not to use plastic as these will melt when baked.
I make a square out of some aluminium foil folder a few times to make a little surface to work on that I can pick up. I will transfer the sculpt to a glass dish before baking.
I start by smoothing a rough layer of clay over the foil making sure the shape is like a mountain with no undercuts. I then build up the face using small balls of clay of equal sizes on each side. I add a long sausage of clay around the eyelids and use the tools to smooth the joins between old clay and new.

When I was happy with the shape I decided to add some texture. First with the large rubber tip tool working from the bottom up to create a more realistic texture and following the hair patterns and directions of the face. Then I used a pin to go over again to create some finer hairs. The mold will smooth these out so best to go a little more exaggerated to make up for this. I set this sculpt aside for now.

How to Make a Polymer Clay Ear Saver for a Custom Mold
Next I move on to the second sculpt. I had seen a few people using ear savers which are usually bits of plastic that you can hook the ear strings of PPE mask onto to stop them from rubbing against your ears. I thought it would be nice to make a more decorative fun one so I decided to make a two headed happy worm.
Again I started by folding another foil square. I then rolled out a long sausage shape making sure its even. I make the sausage into an S shape and then start to push the sides of the worm down so it’s more like a worm cut in half. This makes sure it won’t get trapped in the mold.

One the sides are all flush with the foil I smooth the clay on the ends and use the small rubber tip tool to make holes for the eyes and mouth. Again exaggerating them slightly. Next I use the dental tool to add bands along the shape until I reach the other end.

When the sculpt is done it’s time to transfer them to whatever flat oven safe surface you want to bake them on. I am going to use a Pyrex Lasagne Dish as I find this protects the sculpts a little when baking and has a nice thick flat even surface on the bottom. Make sure that your sculpt is pressed down onto the baking surface so that it will lay flat when it’s transferred to the Mayku later on. I used cosclay so It’s important to cure in the oven at 275°F for at least 30 minutes per ¼” of material.
How to Bake Polymer Clay
You can bake it in most home ovens safely. I use a glass dish but you can bake on a tile or over safe plate. Baking times vary across each brand so check the one you are using. I recommend getting an oven thermometer to make sure you're not going above or below the ideal temperature.
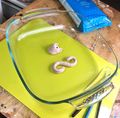
The heat is what cures the plastic and turns it from a clay to a rubbery plastic so it’s important to not under bake it. It’s better to over bake then not bake it for long enough. When the piece is baked turn the oven off, prop the door open slightly and allow to cool down to room temperature.
How to Make a Mold with Polymer Clay and the Mayku FormBox
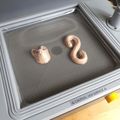
When your sculpts have cooled down it’s time to set up your FormBox. You don’t need to put anything on the clay to stop it sticking. Load one of the casting sheets and lift it up to the heating section of the FormBox. Place the shapes on the bed of the machine. Wait for the sheet to heat up. I personally skip using the timer and just watch the sheet. As soon as it starts to dip down I pull the sheet down to create the mould. Leave to cool for one minute and then you can take your objects out ready for casting!
And to conclude...
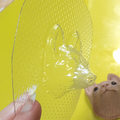
Using CosClay definitely helped and make removing them very easy. I think as these pieces are so small I probably could have exaggerated the features and textures even more. I will be casting them using UV resin with the technique I will be talking about in the next tutorial.
If you want to see more of my work, you can go to my website. Or follow me on Instagram, Twitter or Facebook.
Thanks for reading and happy Sculpting and Molding !
Adele xxx
Want to know more about the Mayku FormBox? Request to speak to a specialist today and a local expert will contact you to discuss how the FormBox could transform your workflow. For more inspiration and ideas, follow @TeamMayku on Twitter, Facebook, Instagram and YouTube.


